FAQ.
Urban tag
The Asset tag is certified IP67. It is waterproof, dustproof and weather resistant.
2 – To change the name of your tracker, click on the icon
3 – To change the picture of your tracker, click on the icon
2 – Click on the button + to access to the addition of the new tracker.
3 – Complete the S/N and the Key indicated on the back of the tracker.
(It is normal that the first letter (A or B) of the S/N does not then appear in the tracker name because it is the tracker’s model indicator.)
or
Click on the QR code icon and scan the back of the tracker.
To find out the battery status of your tracker, log on to the web platform or the application.
In “My Devices” :
In the left menu, “Devices” then “My Devices”, you can see the information of your tracker and its battery percentage.
In “Map” :
Select the tracker for which you want to know the information in the top box.
Click on the icon
“Low battery” alert:
Create a low battery alert. The alert will be triggered when the battery is at less than 20% of its capacity and you will receive an SMS or email, depending on the configuration of your alert.
The Wavebit software for PC and Mac is available for download on the Wavebit website.
The Wavebit software is essential for the configuration of Urban tag and the export to your Wavebit space of the tracks recorded via the logger.
Asset tag: 75x75x35mm and 60g.
The Wavebit software for PC and Mac is available for download on the Wavebit website.
The Wavebit software is essential for the configuration of Urban tag and the export to your Wavebit space of the tracks recorded via the logger.
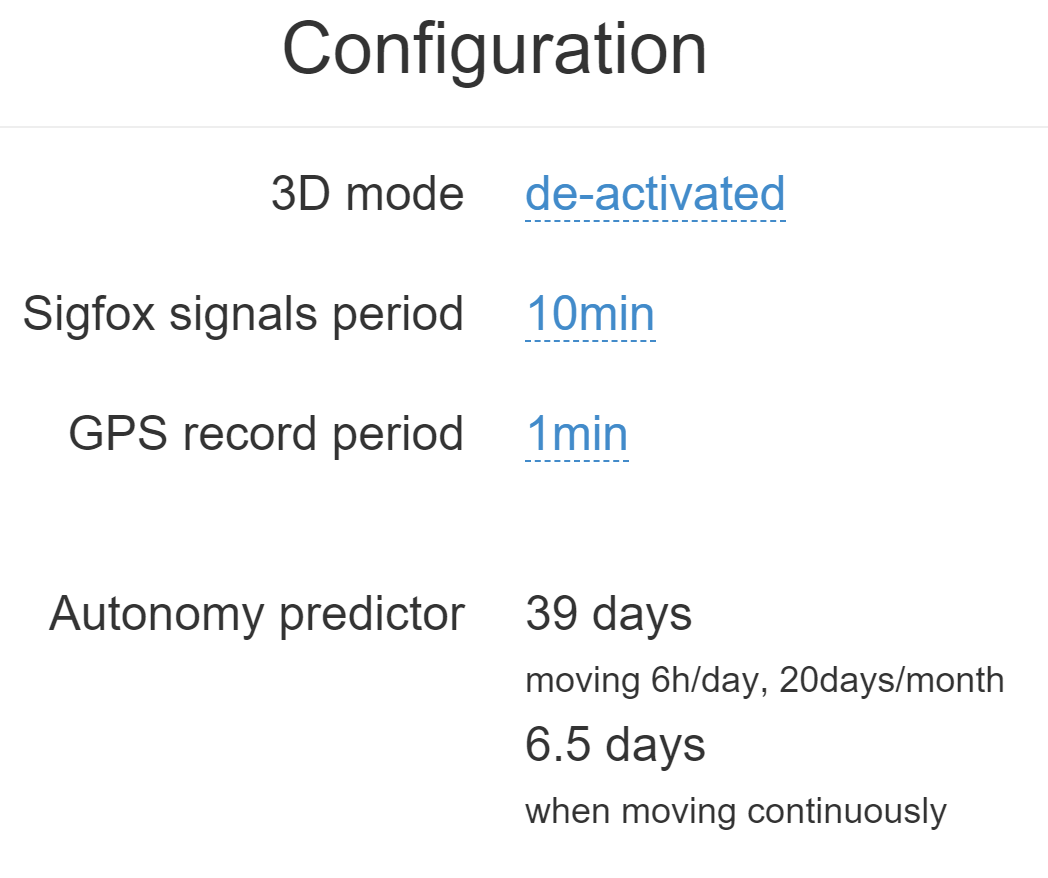
1 – Launch the Wavebit software.
2 – Go to “Settings” at the top middle of the menu and you will be able to choose this parameter.
3 – You will be able to choose the time intervals.
The interval between messages, corresponds to the time between the data sent by the tracker via the Sigfox network.
The interval between GPS positions, corresponds to the time between the fixed position by the tracker, and thus the time interval of the tracker.
The Wavebit software for PC and Mac is available for download on the Wavebit website.
The Wavebit software is essential for the configuration of Urban tag and the export to your Wavebit space of the tracks recorded via the logger.
1 – Launch the Wavebit software.
2 – Go to “Advanced Settings” at the top right of the menu.
3 – This will allow you to update the tracker if it does not already have the latest version.
The Wavebit software for PC and Mac is available for download on the Wavebit website.
The Wavebit software is essential for the configuration of Urban tag and the export to your Wavebit space of the tracks recorded via the logger.
1 – Launch the Wavebit software.
2 – Go to “Settings” at the top middle of the menu and you will be able to choose this parameter.
When the “flight mode” or 3D mode of the tracker is deactivated, it will send previous positions of the tracker, allowing real-time tracking with an accuracy of about 3 minutes. And when it is activated, the tracker will send its speed and altitude when sending the last known position.
Power off: The red LED lights up and the blue LED flashes once.
Send 3 clicks alert: The red LED and green will flash alternately.
Send alert: The blue LED flashes as many times as the button is pressed.
Battery charge: When the bottom right LED is red, it means that the Urban tag is charging. When it turns green, it means that the tracker is charged.
It is possible to increase this frequency in the PC/Mac Wavebit software by connecting your tracker to your computer (Urban tag).
Urban tag: Area entry, area exit, motion detection, no motion, 3 press button, 1 press button, 2 press button, 4 press button, 1 long press button and low battery.
Asset tag: Area entry, area exit, motion detection, no motion, low battery.
The main position losses come from the stalling of the signals between the tracker and the satellites, thus preventing the triangulation of the position:
– From GPS fix just after departure, cold, where the device could no longer see the constellation of the satellites, and therefore needs about 3 minutes before starting to move to find their position and thus start to fix its position correctly.
– From the outside environment: trees, buildings and even clouds can prevent the proper reception of data from a satellite and can cause triangulation to be prevented or accuracy to be lost.
Asset tag
The Asset tag is certified IP67. It is waterproof, dustproof and weather resistant.
2 – To change the name of your tracker, click on the icon
3 – To change the picture of your tracker, click on the icon
2 – Click on the button + to access to the addition of the new tracker.
3 – Complete the S/N and the Key indicated on the back of the tracker.
(It is normal that the first letter (A or B) of the S/N does not then appear in the tracker name because it is the tracker’s model indicator.)
or
Click on the QR code icon and scan the back of the tracker.
2 – Gently remove the tab.
3 – Tighten the 4 screws without tightening too much.
4 – Associate your tracker to your Wavebit account.
2 – Click on the button + to access to the addition of the new tracker.
3 – Complete the S/N and the Key indicated on the back of the tracker.
(It is normal that the first letter (A or B) of the S/N does not then appear in the tracker name because it is the tracker’s model indicator.)
or
Click on the QR code icon and scan the back of the tracker.
Asset tag: 75x75x35mm and 60g.
Other fixing systems are possible: double-face adhesive tape, magnets, horse clamp, etc.
Install or change the battery
1 – Make sure you are in good condition to perform battery change (not
exceeding temperature usage range, no water on the case, the battery
or the operator’s hands.
2 – Remove the 4 screws using a proper screwdriver.
3 – If already inserted remove the old battery and recycle in accordance
with the applicable recycling instructions in force in your country.
4 – Insert the new battery by strictly respecting polarity plus and minus (+/-)
as written on the battery and on the sticker. The “+” pole of the battery
must go to the “+” side of the battery holder.
5 – Close the casing by tightening the four screws.
To find out the percentage of battery in your tracker, log on to the web platform or application.
In “My Devices”:
In the left menu, “Devices” then “My Devices”, you can see the information of your tracker and its battery percentage.
On the map:
Select the tracker for which you want to know the information in the top box.
Click on the icon
“Low battery” alert:
Create a low battery alert. The alert will be triggered when the battery is at less than 20% of its capacity and you will receive an SMS or email, depending on the configuration of your alert.
It is possible to increase this frequency in the PC/Mac Wavebit software by connecting your tracker to your computer (Urban tag).
Install or change the battery
1 – Make sure you are in good condition to perform battery change (not
exceeding temperature usage range, no water on the case, the battery
or the operator’s hands.
2 – Remove the 4 screws using a proper screwdriver.
3 – If already inserted remove the old battery and recycle in accordance
with the applicable recycling instructions in force in your country.
4 – Insert the new battery by strictly respecting polarity plus and minus (+/-)
as written on the battery and on the sticker. The “+” pole of the battery
must go to the “+” side of the battery holder.
5 – Close the casing by tightening the four screws.
To find out the percentage of battery in your tracker, log on to the web platform or application.
In “My Devices”:
In the left menu, “Devices” then “My Devices”, you can see the information of your tracker and its battery percentage.
On the map:
Select the tracker for which you want to know the information in the top box.
Click on the icon
“Low battery” alert:
Create a low battery alert. The alert will be triggered when the battery is at less than 20% of its capacity and you will receive an SMS or email, depending on the configuration of your alert.
Urban tag: Area entry, area exit, motion detection, no motion, 3 press button, 1 press button, 2 press button, 4 press button, 1 long press button and low battery.
Asset tag: Area entry, area exit, motion detection, no motion, low battery.
The main position losses come from the stalling of the signals between the tracker and the satellites, thus preventing the triangulation of the position:
– From GPS fix just after departure, cold, where the device could no longer see the constellation of the satellites, and therefore needs about 3 minutes before starting to move to find their position and thus start to fix its position correctly.
– From the outside environment: trees, buildings and even clouds can prevent the proper reception of data from a satellite and can cause triangulation to be prevented or accuracy to be lost.
Network and subscriptions
1 – On Connect or the Wavebit application, open the left menu and click on My Devices.
2 – You can see the informations for your trackers and the date of soubscription, which appears in blue.

To find out the coverage of the Sigfox network in your area, log on to: https://coverage.heliotgroup.com/.
2 – Click on Profile
3 – Click on SMS.
4 – The number of remaining SMS messages will be indicated as well as the link to add more.
Overseas France: French Guiana, French Polynesia, Guadeloupe, Martinique, Mayotte, New Caledonia, Reunion.
Middle East and Africa: Botswana, Kenya, Mauritius, Nigeria, Oman, Senegal, South Africa, Swaziland, United Arab Emirates.
Functions via Wavebit web/mobile interface
2 – To change the name of your tracker, click on the icon
3 – To change the picture of your tracker, click on the icon
Create a share and activate it by clicking on
Copy the link to share by clicking on
1 – On Connect or the Wavebit application, open the left menu and click on My Private Shares.
2 – Click on the button + to create a new share. Your share will appear.
– To change the name of your share, click
– To delete your share, click
– To turn on/off your share, click
– To select the tracker that you want to share, click
– To change the track length, click
– To add a GPX track to your share, click
– To copy the share link and send it to your friends and family, click
Via “Map”:
Click on the icon
The Wavebit Connect platform is available via this link: https://connect.wavebit.io/
2 – Click on Profile
3 – Choose the language between English, German, French, Spanish, Italian, Russian and Arabic.
Registration with an e-mail address:
1 – Click on “You don’t have an account? Create one now”
2 – Complete: “name”, “email”, “password”. Your password must contain at least 8 characters.
3 – Accept the terms and conditions.
4 – Click on the button Sign up.
Attention:
When reconnecting, do not confuse an account created with a Email address and a Google Account.
1 – On Connect or the Wavebit application, open the left menu and click on My Private Shares.
2 – Click on the button + to create a new share. Your share will appear.
– To change the name of your share, click
– To delete your share, click
– To turn on/off your share, click
– To select the tracker that you want to share, click
– To change the track length, click
– To add a GPX track to your share, click
– To copy the share link and send it to your friends and family, click
You can also click directly on these links:
Wavebit Android application
Wavebit IOS application
2 – Click on Profile
On this page you have the possibility to change the name, the picture, the default email address of the account and the language of the interface. You also have the SMS page allowing you to see the number of remaining SMS messages as well as the history of alerts sent by email and finally the possibility to change the password for an account with email login and password.
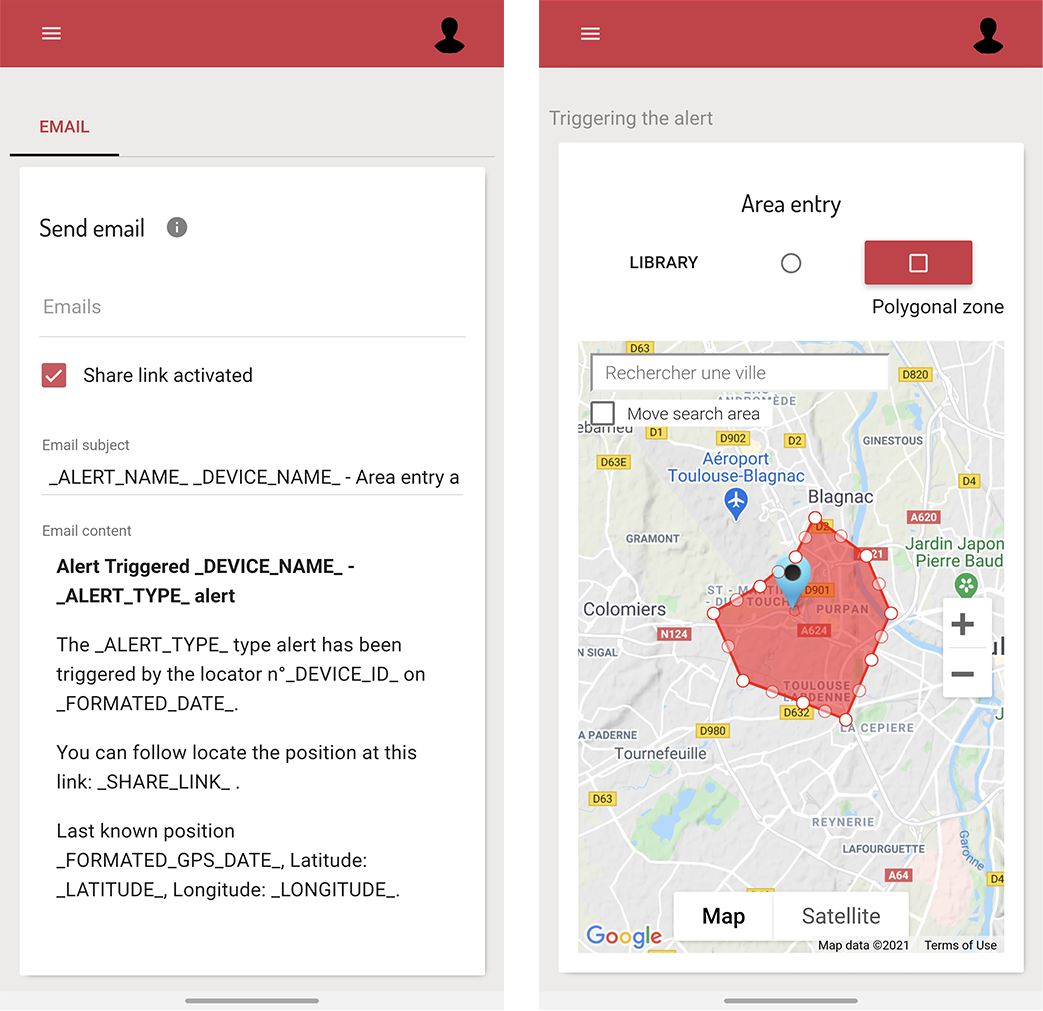
2 – Click on the button + to access to the addition of the new area.
3 – Create a specific area by moving the points that surround it, give it a name, a color and validate. Create all the areas you need this way.
4 – All the areas you created are now on the map at the top of this same page. They are also saved in the library of your account in order to reuse them by creating area alerts.
5 – The check in / check out table is at the bottom of the same page. It allows you to have precise data on the trackers that have entered or left these areas, as well as the times and dates.
2 – Choose the tracker you want to configure.
3 – Activate, deactivate an alert:
The alert is activated when the “Activated” button is red.
The alert is deactivated when the “Activate” button is white.
Click on the button to activate/deactivate.
4 – Delete an alert:
To delete an alert, simply click on the icon
2 – Choose the tracker you want to configure.
3 – To create a new alert, click on
4 – Click on the icon
Possible configurations:
– Add a name to the alert.
– Enable automatic reactivation of the alert.
– Create time slots for triggering alerts.
– Choose the type of sending of the alert (SMS, Email, API Callback)
Alert content:
– Add one or more Emails, phone numbers, etc..
– Customize the subject and content of the alert as you wish.
– Check the “Share link activated” case if you want to share your tracking link in the alert.
For area alerts:
– Customize the zones by pressing the dots around the red zone.
– Create round or polygonal areas.
– Select an area already registered in the library.
2 – Click on the button
2 – Choose the GPS tracker you want to configure.
3 – Click on the alert you wish to configure or create one.
4 – Click on the icon
5 – Check “time ranges” to unlock the feature.
6 – Check some days of the week.
7 – Choose the hours.

2 – Click on the button + to access to the addition of the new tracker.
3 – Complete the S/N and the Key indicated on the back of the tracker.
(It is normal that the first letter (A or B) of the S/N does not then appear in the tracker name because it is the tracker’s model indicator.)
or
Click on the QR code icon and scan the back of the tracker.
Then simply take the Urban tag with you or attach the Asset tag. The tracker must be switched on and have battery power to send its position when it is in motion.
The main position losses come from the stalling of the signals between the tracker and the satellites, thus preventing the triangulation of the position:
– From GPS fix just after departure, cold, where the device could no longer see the constellation of the satellites, and therefore needs about 3 minutes before starting to move to find their position and thus start to fix its position correctly.
– From the outside environment: trees, buildings and even clouds can prevent the proper reception of data from a satellite and can cause triangulation to be prevented or accuracy to be lost.
The icon ![]() is used to center the tracker’s position on the map.
is used to center the tracker’s position on the map.
The icon ![]() allows you to centre and zoom on the trajectory of the selected tracker.
allows you to centre and zoom on the trajectory of the selected tracker.
The icon ![]() allows you to change the duration of the track you wish to view on the map.
allows you to change the duration of the track you wish to view on the map.
The icon ![]() displays the list of already created shares.
displays the list of already created shares.
The icon ![]() gives access to the two following icons.
gives access to the two following icons.
The icon ![]() corresponds to the breakpoints of the selected tracker.
corresponds to the breakpoints of the selected tracker.
The icon ![]() allows you to export your GPX track.
allows you to export your GPX track.
In the left menu, “Devices” then “My Devices”, you can see the information of your trackers.
On the map:
Select the tracker for which you want to know the information in the top red box.
Click on the icon